Archive for the ‘ Guide ’ Category

How To Combine Stim and Drug Use

Stim Chip MillIn Pardus, both drugs and stim chips (all varieties) give additional action points – and as covered in the article on Stims and their various uses, coloured stim chips offer skilling, movement and trade benefits as well.

Whilst you are under the effects of either drugs or stim chips, consuming the other yields no benefit, preventing the combination of coloured stim chips and drugs.

In reality it is actually possible to combine the effects of coloured stims and drugs!

How Drugs And Stims Work…

Both drugs and stim chips have a limit on the number that can be consumed with any benefit, designed to cap the amount of action points you can obtain in one go. Without advanced skills, for both drugs and stim chips this number is 25 tonnes per 25 hours. With advanced skills, the number of drugs that can be consumed is 30 tonnes per 30 hours.

It used to be believed this quota was timer-based, with one tonne of your quota decaying each hour after you took the initial drug or stim chip.

If you were to take 10 tonnes of drugs at 08:33, your drug level would reduce by one at 33 minutes past each hour, until it got to 18:33 when you would no longer be under any effects of drugging.

Recent developments have discovered the decay of drug and stim chip levels is not timer-based, but is instead tick-based!

It has been observed that the decay in drug and regular stim chip levels happens at 59m03s past each hour in Artemis and at 29m03s past each hour in Orion (and Pegasus). The decay in coloured stim chip levels happens at 29m03s and 59m03s past each hour (across all universes).

Orion & Pegasus:
If you were to take 1t of drugs at 08:26:00, at 08:29:03 you would be considered undrugged again.

Artemis:
If you were to take 1t of drugs at 08:56:00, at 08:59:03 you would be considered undrugged again.

Crucially, the decaying of the effects of coloured stims is still timer-based (lasting 15 minutes from the point of taking them). This opens up the possibility (with careful timing) to leverage both coloured stims and drugs at the same time.

If you were to take 1t of a coloured stim chip at 28m or 58m past the hour, after one minute and three seconds (when the time becomes 29m03s or 59m03s past the hour respectively) the game would no longer consider you to be stimmed up and would allow you to consume drugs without issue. However, the effect of the coloured stim would remain for a further 14 minutes, whilst you are still able to consume drugs.

Here is a handy summary to show exactly how you should plan your combined stim and drug use…

Skilling guide:

  • Take 1t of crimson stims at 28m or 58m past the hour
  • Skill away
  • Take drugs after 29m03s or 59m03s past the hour (depending on universe)
  • Continue to skill away under the effects of the crimson stim

Moving guide:

  • Take 1t of amber stims at 28m or 58m past the hour
  • Do your thing
  • Take drugs after 29m03s or 59m03s past the hour (depending on universe)
  • Continue to move at a reduced AP rate under the effects of the amber stim

Trading guide:

  • Take 1t of capri stims at 28m or 58m past the hour
  • Trade away
  • Take drugs after 29m03s or 59m03s past the hour (depending on universe)
  • Continue to trade at a reduced AP rate under the effects of the capri stim

A big thank you to Tro who took the time to bring all this together into a handy guide.

The Feral Serpent

To celebrate Pardus’s 12th birthday in Sept 2016, an update to the Feral Serpent was introduced to the universe. The most obvious addition was the Feral Egg… but no further information was available as to what to do with these eggs.

A rare new commodity – the Feral Egg – is now available. Although feral eggs already command a high price on the black market, their use is yet unknown.

Furthermore we have the following tidbits:

  • Feral Serpents behave differently depending on their maturity – this is now visually apparent.
  • Based on their maturity, they may drop one or more feral eggs on death.
  • The mobility of Feral Serpents in general has been improved.

The details unravelled…

You can Explore the Den at Nhandu [23,26] for eggs. A Feral Egg spawns at the Feral Den just after server reset (0530 GMT) and can be harvested at the Den by clicking the Explore the Den link at Nhandu [23,26].

We are also told that the Feral Serpent drops Feral Eggs when he is killed (a different amount depending on what stage you kill him at). These Feral Eggs are used to purchase special new equipment from the Feral Serpent Outpost.

Feral Serpent Outpost

When you kill the Feral Serpent, a wormhole opens up at the coordinates you killed him – to a completely isolated part of the Pardus sector that contains the new Serpent Outpost.

The wormhole can remain open for up to an hour – but typically closes after about 20 minutes.

When you travel through the wormhole you can enter the special building (the Serpent Outpost) at Pardus [94,32] where you are able to exchange Feral Eggs for various ship equipment and upgrades.

  • Feral Spin Aparatus (Drive) – 19 Feral Eggs
  • Feral-Lucidi Crossover Cannon (Laser) – 13 Feral Eggs
  • Feral Scales (Equipment) – 9 Feral Eggs

All these items are sensitive requiring a Repair Drone to maintain them.

How To Destroy A Starbase

Imperial Player Owned Starbase
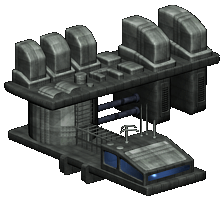
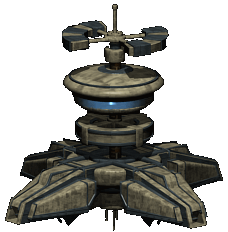
If you are currently commanding a Starbase, then you are probably aware that you can initiate a self-destruct to destroy your Starbase. This is not something you would do regularly!

This guide looks at how you would go about destroying an undefended Starbase belonging to someone else.

It is possible to assault and destroy a Starbase successfully using pilots – usually for Starbases with minimal (or no) defenses. In reality it is much more common to use Squadrons for this task – especially since it can all be undertaken by one pilot.

Bomber or Fighter Squadrons?

For this task you need to hire Bomber Squadrons. Ultimately this is because they have better armor and are able to take more damage without being destroyed.

How Many Bomber Squadrons Are Needed?

This is based on how many Heavy Defense Modules are present on the Starbase you are attacking. Assuming the Starbase is undefended, the following gives you an idea of how many Squadrons you should require.

HDAs on Starbase Bomber Squadrons Required
0 – 3 5 Squadrons
4 – 5 6 Squadrons
6 – 7 8 Squadrons
8 – 9 10 Squadrons
10 – 11 13 Squadrons
12 – 13 15 Squadrons
14 – 15 17 Squadrons
16 18 Squadrons

You will need to hire Bomber Squadrons and get them to the target Starbase without arousing the suspicion of, well, anyone. The amount of APs available to a Squadron at any one time means you will probably need to move and rest your Squadrons several times (sometimes over many days) until they reach the target Starbase.

The ultimate goal is to destroy a Habitat Ring (this consists of 100 building points) and then move into the Command Center before destroying that as well (this consists of a further 300 building points).

You need to ensure your Squadrons have enough APs to do 400 building points of damage before you initiate your attack.

First — Take Out A Habitat Ring

To begin with, move all the Bomber Squadrons on top of the same Habitat Ring (there are 8 to choose from) and click the Attack this building link with one of the Squads.

As well as shooting an array of LV-111 missiles at a single Starbase defense module (chosen randomly each attack), your Bomber Squadron will do building damage based on the number of ships in the Squadron.

Ships in Squadron Building Damage per Attack
100 ships 8 points damage
99 thru 75 ships 6 points damage
74 thru 50 ships 4 points damage
49 thru 25 ships 2 points damage
24 thru 1 ships no damage

The first attack you do with a full 100 ship Bomber Squadron will take 8 points off the Habitat Ring (although due to the mechanics of how damage is resolved, this may end up being 6 points). Once you have attacked once, switch to another 100 ship Bomber Squadron and repeat until all squadrons are now less than 100 ships.

Continue the attack, using the Bomber Squadron with the most ships every time. This will likely see you switching browser tabs a lot and requires some concentration. While the number of ships in each attacking Squardon is above 75, each attack will be taking 6 points off the Habitat Ring.

After about 18 attacks you should have destroyed the Habitat Ring. This will trigger a GNN entry – so be quick to move all your Squadrons to the Command Centre.

Next — Take Out The Command Centre

Move all your Bomber Squadrons to the Command Centre and continue the attack, using the Bomber Squadron with the most ships every time. Remember that you need to deal a total of 300 points of building damage to destroy the Command Centre.

Once you have destroyed the Command Center, the Starbase disappears (and there is a further GNN entry). Job done!

Real example — Against a 6x HDA Starbase using 9 bombers (and with no defence) will require about 90 rounds before the Starbase is destroyed (this ought to leave all 9x Squadrons between 65 and 55 ships each)

Stims And Their Various Uses

Stim Chip MillFor a long time we have had Stim Chips, a legal alternative to Drugs (and a topic we discussed as Pardus Stim Chip Facts in the past).

An update to the Stim Chip Mill was announced in August 2015 where we saw the introduction of three new types of Stim Chips, each with their own special effect.

When using one of these Stims, just take one at a time (and make sure you are not under the effects of regular drugs – find out how to combine stim and drug usage). Each Stim lasts for 15 minutes and will give you the same AP gain as a regular Stim Chip, in addition to the following effects…

Crimson Stim

Crimson Stim ChipIt has been observed that combat pilots show very quick learning abilities when taking Crimson Stim immediately before battle.

The Crimson Stim doubles the rate of skill gain for Tactics, Hit Accuracy and Maneuver (up to a skill level of 65). This makes it an absolute must-have for pilots grinding out ASP or just skilling.

You can tell you are under the effect of a Crimson Stim because it says so on the NPC combat screen.

Capri Stim

Capri Stim ChipIt appears to give its user a heightened sensitivity of surrounding space. It is also reported to increase focus, especially when trading or harvesting.

The Capri Stim decreases AP cost for trading by 3 and for harvesting by 5. It also shows the resource levels on all fields on the main Nav screen (so you know if you are under the effect of a Capri Stim by this very visual change to the main Nav screen alone).

For a trader with a Class I Teleporter installed (which reduces the cost of trading to 5 AP) this means they can do a trade for just 2 AP! If you have a lot of buildings close together in your economy, then this is the choice for you!

Amber Stim

Amber Stim ChipUsers report that time seems to slow down when navigating under the influence of Amber Stim.

The Amber Stim decreases AP cost for movement by 1 across all field types. This is ideal if you need to travel any great distance, combined with the recent ability to Pack Goods, this seems ideal for hauling goods long distance.

You can tell you are under the effect of a Amber Stim because there is a small amber “-1” beside the movement cost icon in the Status section of the main Nav screen.

Releasing The Feral Serpent

Feral Serpent
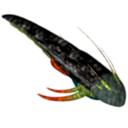
The Feral Serpent has the highest threat rating for an NPC. It wanders the universe (in some cases very quickly), teleports through Wormholes and across MO lines, and aggressivley targets pilots as it romps around on a killing spree.

Check out the Feral Serpent details at Blacksun’s Pardus Resources for vital statistics on this NPC.

Unlike most NPCs, the Feral Serpent doesn’t spawn in the same place. Under the section on NPC Spawning, the Pardus Manual mentions that the Feral Serpent uses Triggered Spawning.

How Do You Trigger The Feral Serpent?

Serpent DenAccording to the Pardus Manual, the Feral Serpent is spawned by searching the Serpent Den from time to time.

First you need to visit the Serpent Den in Nhandu [23,26].

Once there, choose to Explore the Den via from the Commands panel in the navigation screen.

Explore The Den

Upon exploring the den, one of two message will show in the message frame of the main screen.

If the Feral Serpent is not already loose in the universe – and he died at least 7 days previous, you will be successful in releasing the Feral Serpent and will see:

You catch a glimpse of something quickly fleeing the den!

Otherwise you are not successful and you will see:

The den appears to be uninhabited at this time.

A Practical Stim Chip Economy

Neural Laboratory

Hot on the heels of Asura’s recent article Considering Making A Stim Chip Mill?, Rylar has investigated in more detail setting up a Stim Chip economy.

This article details the building setup and resource usage whilst maintaining details on profit. The conclusions are surprising!

Introduction

The lowest reasonable price for Neural Tissue, assuming a low trader income and a 2000/cr/tick owner income, is 145 cr/ton. The boost for low crime means each chip is about 158 credits cheaper to produce. Nice to have, but nothing exciting.

A Stim Chip Mill needs a large capacity to be effective, much like a Nebula Plant. So, we’re going to assume ideal conditions. The Stim Chip Mills are level 10, the Neural Labs are level 8 and everything is located near to an NPC starbase on the FWE route.

Proximity to a well stocked NPC starbase is important because only they can produce enough Animal Embryos to be considered effective. Even a Player owned starbase will be hard-pressed to make 3 Neural Labs tick.

A Self Sustaining Chain

In a low crime cluster, a single level 10 Stim Chip Mill requires 2.6 level 8 Neural Labs. Realistically, Stim Chip Mills are harder to stock, so 2.5 Neural Labs per Stim Chip Mill is a good goal.

In our set up with 5 Neural Labs and 2 mills, we’ll need the following buildings:

  • 5× Neural Labs (level 8)
  • 2× Stim Chip Mills (level 10)
  • 1× Medical Laboratory (level 9)
  • 1× Electronics Facility (level 6)
  • 1× Smelting Facility (level 6)
  • 1× Plastics Facility (level 6)
  • 1× Chemical Laboratory (level 6)

Here are the resource requirements for a single tick of all those buildings:

  • 98t Food
  • 78t Energy
  • 98t Water
  • 230t Animal Embryos
  • 40t Medicine
  • 38t Nebula Gas
  • 18t Electronics
  • 18t Exotic Matter
  • 6t Heavy Plastic
  • 9t Metal
  • 12t Ore
  • 9t Chemicals

This chain requires an NPC starbase approaching 180,000 population to produce enough embryos. Note that this base will consume 470 tons of food every 4 hours.

Profit

With an ideal chain, low crime rate, low building income and low trade income, you can expect to sell chips for 3,800 credits each. Each Stim Chip gives about, 1/3rd the action points that drugs can provide (which sell for around 12,000 credits each). So, you can realistically expect 17,600 cr/day on Stim Chip sales.

This does not include the build cost (or defense module cost) for each of the buildings in the chain – certainly for the high level buildings (which require large capacity) this will require a significant supply of Metal and Ore.

Conclusion

Clearly the Pardus programmers are bad at math. You should not pursue Stim Chip for profit. Even Space Farms and Nebula Plants will serve you better than Stim Chips.

On the plus side, Stim Chips allow you to run a crime free cluster – which is priceless for Military Outpost quality.

Stim Chip Mill

Anyone with at least 10,000 experience points can build a Stim Chip Mill. What does it take to keep one running successfully? How does one select a practical location? What are the most difficult hurdles to overcome?

Rylar wrote about Stim Chips when they were first introduced to Pardus, and now Asura has contributed more details on actually planning (and implementing) a Stim Chip chain.

Where To Build?

The bottleneck for a good location is Neural Matter. Yes, you need Exotic Matter (you will need to be within trade range of an Exotic Matter source) but a smaller trade ship (like a Babel or a T-Bird) can carry enough Exotic Matter to keep your Stim Chip Mill supplied for many production cycles. The same is true for Electronics – you need a supply, but not necessarily a high-volume supply.

To keep a Level 2 Stim Chip Mill in production, you need 50/56/62 tons of Neural Matter per cycle (varying by the crime level of the cluster). If you have a slightly lower supply available in the sector, then you’ll occasionally spend a cycle without producing – but if you’re producing chips on, say, 9 out of 10 cycles, then that’s reasonably efficient.

So you will need a Neural Lab somewhere very close to your Stim Chip Mill, close enough that you can haul Neural Matter from the Neural Lab to the Stim Chip Mill at sustainable AP cost. Note that a level 5 Neural Lab produces 48 tons per cycle; a level 6 Neural Lab produces 56 tons per cycle.

A level 5 Neural Lab requires 31 tons of Animal Embryos per cycle whilst a level 6 Neural Lab requires 36 tons. Therefore, the Neural Lab should be close to an active Starbase, a Type G Planet, a Type I Planet, and/or a type R planet. An ideal location might include more than one Animal Embryo source – and consider the needs of any Space Farms also supported by that source (you don’t want to break an economy that is already in balance).

A Neural Lab also needs Food, Water, Energy and Medicine – so you will need to source Medicines from somewhere as well.

Making Good Use Of Your Building Slots

Since it requires you have at least 10,000 XP to build a Stim Chip Mill, you will already have at least three building slots. One for the Stim Chip Mill and one for a Neural Lab would be an ideal start.

You might use your third slot to establish your own supply of Medicine or Electronics. If not, then perhaps you could build a Trade Outpost and sell your Stim Chips from there (whilst also using the Trade Outpost to store extra resources you need to support your other buildings). Other options might include a Military Outpost to help defend the location which includes your buildings. Perhaps before you build the Neural Lab and the Stim Chip Mill you might build an Asteroid Mine or Smelting Facility to generate the building materials you will use. I’m curious to learn about other third-slot synergies (please feed back to Asura or Sparkle in Artemis on this)!

What Makes a Good Building Location?

The upkeep requirements for a Stim Chip Mill vary based on the Crime Level of the cluster it is built in – so check the Crime Rate first (click the Statistics menu and then the Other tab).

Narrow down a few sectors where there is currently an Animal Embryo supply that is currently going to waste; or where the Animal Embryo supply could (and would) increase if you become a local consumer.

Consider faction and Alliance politics as well. Are there people who would actively interfere, by indirect means (such as buying up the materials you’ll need), or more direct means (such as attacking your ship and/or raiding your buildings)? Are there Military Outposts between you and your upkeep sources (and will you have permission to pass those Military Outposts)? Are there Military Outposts which would protect you from raiders? Are there supporters who would come to your defense if needed? Will your buildings affect which Alliance has sector dominance? Is the location often disrupted by Alliance conflicts or full-fledged Faction wars?

Check for NPC spawn locations. If you are near Asteroids or Nebula Gas, would you mind running into cloaked NPCs when trading your buildings? The Stim Chip Mill can be built on an energy field – are there Pirate NPC spawn locations nearby?

Finally, send Asura in Artemis any feedback on what worked for you (and what didn’t), so that this article can be updated and become more useful!

Introducing The Vyrex

Vyrex HatcherOn 14th September 2014 (the 10th anniversary of Pardus), a new NPC family was introduced. The Vyrex are an aggressive and expansive species that, like the Locusts, have the ability to take over a sector completely.

Many pilots have reported intel on the Vyrex, and I have attempted to summarise these observations in this post.

Introducing The Vyrex…

A lot of detailed information on the Vyrex family is available at Blacksun’s Pardus Resources as well as in the Pardus Forums.

Armor
(Pardus)
Hull Exp Move Aggro? Blocks?
Vyrex Larva
Vyrex Larva
300
(x2)
320 55 N N Y
Vyrex Hatcher
Vyrex Hatcher
30,000
(x5)
8,000 750 N Y N
Vyrex Assassin
Vyrex Assassin
320
(x3)
400 105 Y Y Y
Vyrex Stinger
Vyrex Stinger
1,200
(x4)
600 800 Y Y Y
Vyrex Mutant Mauler
Vyrex Mutant Mauler
2,160
(x5)
620 5,500 Y Y Y

Vyrex Infestation Observations…

Vyrex AssassinThe first sign of infestation is a single Vyrex Assassin. This NPC moves and can travel via Wormholes to different sectors. After a period of time the Vyrex Assassin will evolve into a Vyrex Hatcher.

Vyrex HatcherThere can only be one Vyrex Hatcher in a sector at any one time, and once they are present, they begin spawning Vyrex Larva (and the occasional Vyrex Assassin) until they are killed.

Once the Vyrex Hatcher has been killed, a random Vyrex Assassin in the sector will evolve into a Vyrex Hatcher and the pattern will repeat.

Vyrex LarvaVyrex Larva will only appear within 6 tiles of where the Vyrex Hatcher is located. Larva share the same spawn times as Exocrabs – 7 times an hour (x:00, x:09, x:18, x:27, x:34, x:45, x:54).

Update: Larva appear to spawn within 6 tiles of a Hatcher (this was initially observed at 4 tiles, then changed to 5 tiles before settling on the current 6 tiles) – so a 13 by 13 tile area centered around the Hatcher

After a couple of days, the Vyrex Larva will mature to Vyrex Assassins – which will then spread the infection to adjacent sectors as the Vyrex Assassins move through Wormholes.

Vyrex StingerIf left long enough, Vyrex Assassins will eventually change in to Vyrex Stingers and eventually the Vyrex Stingers can change into the Vyrex Mauler.

All members of the Vyrex family (except the Vyrex Hatcher) can stack underneath other NPCs – but they do not stack on the same tile as a Vyrex Hatcher.

Getting Rid Of Them

The best strategy to eradicate Vyrex from a sector is to weaken the Vyrex Hatcher first, then kill all Vyrex Assassins in the sector, then all Vyrex Larva in the 4 tiles adjacent to the Vyrex Hatcher and finally kill off the Vyrex Hatcher itself (note that all of the Vyrex family can cloak, so an entire sector sweep is required before killing the Vyrex Hatcher).

Military Outpost Update

A Military Outpost
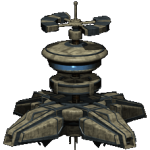
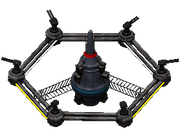
On the day of the 10th anniversary of Pardus, some much anticipated updates to the Military Outpost finally arrived.

A full explanation is included in the Pardus Manual, but I wanted to summarise some of the main points here.

Hospitaility to Young Pilots

According to the Pardus In Game News where the Military Outpost update was initially announced:

…new players sometimes had a hard time to explore the universe due to the ever-increasing rigidity and fragmentation of territories…

Military Outpost owners now have the ability to allow pilots who are under newbie protection (those that have played less than 50,000 action points) to pass through the Military Outpost – regardless of whether they would normally be allowed to. This option is enabled by default and is able to be configured via the Pass Settings option for the Military Outpost.

If you have a Military Outpost and you do not want to grant passage to pilots under newbie protection, don’t forget to change your Pass settings disable passage for them by removing the checkbox beside the option “Allow passage to pilots new to space” (and don’t forget to them press the “Save” button).

Surveillance Settings

With the introduction of a Surveillance Grid, there is now a chance that pilots can pass a blocking Military Outpost – even though previously they would not have been granted passage.

All ship types have been grouped into one of three categories to reflect their ship signature (clear, average, faint) and that signature is used to determine the chance of passing through a (normally blocking) Military Outpost.

The higher you set the value of the Detection Grid Strength (via a sliding control on the Pass Settings screen) the lower the chance a ship is granted passage (if they would normally be blocked) and the more upkeep your Military Outpost will consume per tick.

If you leave the Detection Grid Strength at zero, your Military Outpost will use the same upkeep as it always has (5t Fuel and 5t Energy) per tick. This setting will allow ships (that are normally blocked) with a clear signature to be blocked 75% of the time (so they have a 25% chance to pass), those with an average signature will be blocked 25% of the time and those with a faint signature will not be blocked at all.

If you set the Detection Grid Strength to the maximum value of 20, your Military Outpost upkeep changes to require 15t Fuel, 15t Energy and 15t Radiation Cells per tick. This setting will block all ships (regardless of their signature) 100% of the time.

The optimal setting (considering the upkeep cost versus the threat level from ships) for the Detection Grid Strength is value 15 requiring 15t Fuel, 15t Energy and 5t Radiation Cells per tick for upkeep. This prevents passage for ships with a clear and average signature 100% of the time whilst preventing passage for ships with a faint signature 75% of the time.

Crime Level

The chance to block a ship is further modified based on the crime level for the cluster. Low Crime level increases the chance of blocking a ship by 10% whilst High Crime level reduces the chance by 5% and Critical Crime level reduces it by 10%.

Some Examples

A Military Outpost in a Low Crime level cluster:

Detection Grid Strength Blocks Clear Signature Blocks Average Signature Blocks Faint Signature
0 85% 35% 10%
3 100% 50% 25%
13 100% 100% 75%
15 100% 100% 85%
18 100% 100% 100%

A Military Outpost in a Medium Crime level cluster:

Detection Grid Strength Blocks Clear Signature Blocks Average Signature Blocks Faint Signature
0 75% 25% 0%
5 100% 50% 25%
15 100% 100% 75%
20 100% 100% 100%

A Military Outpost in a High Crime level cluster:

Detection Grid Strength Blocks Clear Signature Blocks Average Signature Blocks Faint Signature
0 70% 20% 0%
5 95% 45% 20%
15 95% 95% 70%
20 95% 95% 95%

A Military Outpost in a Critical Crime level cluster:

Detection Grid Strength Blocks Clear Signature Blocks Average Signature Blocks Faint Signature
0 65% 15% 0%
5 90% 40% 15%
15 90% 90% 65%
20 90% 90% 90%

From the tables above it is obvious that the Crime Level in a cluster is now something that military planners need to take into consideration when planning defences.

How To Grow Squads

Bomber SquadsIf you own a Starbase, you might be interested in how to manage the growth of squads… you may have noticed that the Pardus Manual is a little sparse on details.

Each Starbase can ultimately have 12 squads totalling 100 fighters or bombers – but there are certain conditions that need to be met to achieve this maximum.

When you have 1 ring on your Starbase you can grow up to 3 squads, each squad that “spawns” will be randomly a fighter or a bomber squad – and once spawned, the maximum the squad will grow to is 50. This growth occurs at 0313 GMT every 24 hours.

To increase the number of squads and the amount of fighters or bombers in each squad, you need to increase the number of rings on your Starbase.

Starbase Rings Required Population Max Number of Squads Max Size of Squads
1 500 ~ 5,000 3 50
2 5,000 ~ 15,000 6 65
3 15,000 ~ 30,000 9 80
4 > 30,000 12 100

Fighters or Bombers?

Once a squad has been spawned it will not change (from fighter to bomber or from bomber to fighter), so it’s a good idea to “prune” unwanted squads at an early stage.

You can’t control whether a fighter or bomber squad spawns (at 0313 GMT), but if a fighter spawns and you want a bomber squad instead – hire the fighter right away. The next time a squad spawns, it might be a bomber (if not, just hire the unwanted squad and try again until you get what you want). This is referred to “pruning” squads.

Growth Strategies

Even though you need to have a minimum number of rings to spawn squads, you do not need to maintain the rings to keep the squads once they have spawned.

One way to reach 12 squads of 100 fighters / bombers is to keep 4 rings until they are all grown to full size. This is definitely the easier route.

Another way is to grow the Starbase to 4 rings and get all 12 squads to spawn – and then let the population drop to support 3 rings until all the squads are at 80… before returning to 4 rings again until the squads all grow to 100. This is more Food/Water efficient but does require more attention to your population level.