Archive for the ‘ Guide ’ Category

Features For New Pilots

Back in June 2012, some new features were introduced that benefited pilots who had played less than 1,000,000 APs. This was most likely implemented to allow new pilots to gain skills faster – reducing the number that decide to “give up” early in their career (at least this is my take on it).

The Pardus New Features forum thread describes these features:

The first and tenth kills of each NPC are rewarded with a bonus of 1 point in a skill depending on the killed NPC.

Reaching certain milestones (rank and competency advancements, 100/1000/… experience points) have a revitalizing effect – double AP regeneration for 24 hours.

System Messages

When you kill your first NPC of a particular type you will get a System Message similar to this:

Subject: Skill Bonus
Congratulations, you killed your first Space Clam! As a result of this new experience, you have gained one point in your Energy Collecting skill. There might still be more you could learn from fighting these vermin.

When you kill your tenth NPC of a particular type you will get a System Message similar to this:

Subject: Skill Bonus
Congratulations, you killed your tenth X-993 Battlecruiser! As a result of you becoming familiar with them, your Maneuver skill has increased further.

Note that the last System Message doesn’t mention that there might be more you could learn from continuing to fight them. You will not gain a skill bonus if you kill 100 of the same NPC (although you will achieve a ribbon that can show in your profile as a result).

Skill Bonus Gains

The list below shows the kind of skill gained when killing the 1st and 10th of each NPC (while you have less than 1,000,000 APs played):

Asteroid Mining
Locust Hives
Roidworm Hordes
Space Maggots
Space Snails
Space Worm Albinos
Cloaking
Escorted Smugglers
Experienced Pirates
Famous Pirates
Pirate Captain
Inexperienced Pirates
Lone Smugglers
Fuel Collecting
Bio Scavengers
Fuel Tankers
Space Locusts
Energy Collecting
Energy Locusts
Energy Minnows
Space Clams
Young Space Dragons
Gas Collecting
Gorefanglings
Nebula Locusts
Swarm of Gorefanglings
Hacking
Slave Traders
Combat Skills (randomly TA, HA, MA, WE, EN)
Ancient Crystals
Asp Hatchlings
Asp Mothers
Biks
Blood Amoebas
Blue Crystals
Ceylacennias
Cyborg Mantas
Developed Manifestations
Dreadscorps
Droseras
Elder Space Dragons
Energy Sparkers
Eulerians
Euryales
Euryale Swarmlings
Exocrabs
Frost Crystals
Glowprawns
Gorefangs
Ice Beasts
Infected Creatures
Lucidi Squads
Medusa
Medusa Swarmlings
Mutated Medusas
Mutated Space Maggots
Mutated Space Worms
Nebula Moles
Nebula Serpents
Oblivion Vortexs
Preywinders
Ripe Manifestations
Rive Crystal
Sarracenias
Shadows
Space Dragon Queens
Space Worms
Solar Banshee
Space Crystals
Starclaws
Sthenos
Stheno Swarmlings
Swarm of Energy Bees
Verdant Manifestations
Vyrex Assassin
Vyrex Hatcher
Vyrex Larva
Wormhole Monsters
Xhole Monsters
X-993 Battlecruisers
X-993 Motherships
X-993 Squads
Xalgucennias
Z15 Fighters
Z15 Repair Drones
Z15 Scouts
Z16 Fighters
Z16 Repair Drones
Z16 Spacepads

Interestingly, the Hidden Drug Stash does not give any gains at all!

Action Point Regeneration

System Message
The excitement from acquiring 1000 experience points has a revitalizing effect (your Action Points regeneration is doubled for the next 24 hours).

You will be granted double AP regeneration gains (that last for 24 hours – giving you 48 APs every 6 minutes) when you achieve the following milestones (while you have less than 1,000,000 APs):

Experience Points
100 exp
1,000 exp
10,000 exp
100,000 exp
1,000,000 exp
Compentency and Faction Ranks
Every time your competency increases (once per competency)
Every time your faction rank increases (once per rank)

These AP regeneration bonuses are not cumulative – if you increase rank and competency at the same time, you still only end up with double AP regeneration (which will wear off 24 hours after the last bonus you gained)

Is That All?

You may have noticed that the list of NPCs is far from complete at this stage. If you have recently killed your 1st or 10th of any of the NPCs below, please let me know what you gained and I will update this guide to include your discovery.

  • Feral Serpents
  • Lucidi Motherships
  • Lucidi Warships
  • Vyrex Mutant Mauler

Many of the NPCs listed above are likely impossible to kill for inexperienced pilots – do not attempt them unless you have assistance (and loads of luck)!

The Z-Series Fleet

Only found in the Neutral Zone, the Z-Series of NPCs remain the most effective NPCs outside of premium space to improve basic skills to well above trade-in levels.

The information collected here came from multiple sources including:

Like the Lucidi Squads, those of the Z-Series Fleet that move (Z15 Scout and the Z16 Fighter) tend to do so at predictable times – 7 times every hour at around 1 second past the minute).

Z-Series movement times (per hour): 08 :17 :26 :33 :41 :51 :59

Before you move within 1 tile or attempt to retreat from combat, make sure you check how many minutes past the hour you are currently at – and wait just a few seconds afterwards to ensure they haven’t been delayed by server load.
Read the rest of this entry…

BehemothUsing a Behemoth (with 5x Organic armor and Mining lasers) to engage with Medusa Swarmlings or Euryale Swarmlings for Engineering (EN) gains, is possibly the most efficient way of skilling to trade-in levels as you work on gaining Advanced Combat Skills.

Skilling in this context refers to the act of engaging combat with an NPC, getting hit as much as possible (to improve EN skill), keeping the NPC alive as long as possible (due to their relative scarcity) and not getting killed while you do it.

You may recall that we covered Overskilling a while back. Now would be a good time to refresh your memory on the topic, especially if you plan to spend some time skilling.

Once your EN reaches trade-in point (the lowest of all the skills at 33) you trade in 4 points (reducing your EN down to 29) in exchange for 8 Advanced Skill Points (ASPs). Your TA and MA also improve as you skill, with both sharing the same trade-in point of 65 and requiring you exchange 10 skill points for 8 ASPs.

For every 4 trade-ins of EN, expect to trade in TA and MA once. Depending on drug use, and the availability of the NPCs, expect to gain around 80 ASPs a month when skilling this way.

Which Combat Skills come first?

The first thing you need to use your Advanced Skill Points is Combat Mastery.

After that, get one level of Offensive Combat (OC). The OC skill drops MA by 50% (normally considered a hefty penalty) so is perfect as a way to make you easier for NPCs to hit. There is no difference in having OC1 or OC3 for this situation. When you are nearing the end of your skilling you can complete OC3.

Important: do not retreat when you have OC active – due to the 50% MA reduction you are much more likely to be hit, leading to loads of damage

Next, get all three levels of Defensive Combat (DC). The DC skill will work the opposite of OC and reduces your chances of being hit by NPCs. Unlike OC, it is better to get DC3 (rather than just DC1) for use while skilling.

Contrary to popular belief, DC does not affect the chance you will be held when retreating from an NPC. This is governed by your Drive Evasion ability and your TA skill

Consider retreating with DC active when you are low on armor and out of robots and for a day or so after you have traded in your MA skill.

The Combat Efficiency skill is great for long term skillers, but you only benefit from the savings it offers you (versus the cost in ASPs to get) if you get it very very early on – so get it early or not at all. If you are going to get it, get CE4 as soon as possible after OC1 and DC3.

Controversially, get Boosts and AB4 – for use as an emergency escape plan. It will improve your MAN by 20% which, like DC, will work to reduce your chances of being hit. This skill should only be used when attempting to retreat from an “hard hitting” NPC and you are out of Robots with very low armor.

Once activated, you need to wait 12 hours for AB to wear off, and because it acts to raise your MAN (which makes you harder to hit), you might want to wait out that 12 hours before returning to skilling

Once you have opened Combat Mastery and have OC1, DC3 (and optionally CE4) completed, along with Boosts and AB4, then it doesn’t really matter what order you choose to do from then on.

What Other Combat Skills?

If you see yourself participating in any amount of ambushing you will need to get Ambush Mastery, AF2 and AE4.

If you plan a lot of Player vs Player (PvP) combat then get Chronoton Collection and Time Bomb Type 1 (stun).

Are you going to remain an Imperial and be a career fighter? Then learn Weapon Mastery and get Conventional Weapon Specialisation (CWSpec4) – all Empire weapons are conventional and will benefit from this. Don’t get it until towards the end since you will do more damage to the NPCs you skill on with it.

Remember to complete OC3 at the end as well.

In Summary…

Combat Mastery, OC1, DC3, CE4, Boosts, AB4, (optionally Ambush Mastery, AF2, AE4, Chronoton Collection, TBI 3, Weapon Mastery, CWSpec4) then finish OC3.

How To Get Some Pardus Armor

Lucidi Armor StationThere is only one place in the universe that you can acquire Pardus Armor – the Lucidi Armor Station located at [96,58] in the Pardus sector.

Gaining access to this mysterious building is fraught with dangers (as a consequence of the corrosive environment in that sector as well as random AP time bombs placed by previous visitors – not all of which are friendly).

Caution: there are several cloaking Lucidi Squads and a Lucidi Mothership roaming in the section of space around (but not actually on) the Armor Station

Assuming you have access to the Pardus sector (you will need Premium for this), and assuming you manage to make it from a Wormhole Seal to the building, you won’t get the armor for free. The Lucidi have no interest in our system of credits – they are much more interested in acquiring Exotic Crystals and will happily provide you with limited use of Pardus Armor in exchange for these strange resources.

Exotic Crystal
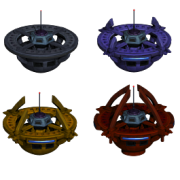
Think of Pardus Armor as a kind of “coating” for the armor you currently have. Depending on what strength of armor you have (x1 through to x6) determines how many Exotic Crystals you will be required to exchange for a “coating” on your armor.

For each level of armor, 1 Exotic Crystal can be exchanged for 2 days of Pardus Armor.

If you have Genotrope Armor installed (x5 Organic) then 5 Exotic Crystals can be exchanged to provide you with 2 days of Pardus Armor. If you had the Union faction x6 Conventional Armor (reserved for those who have attained the rank of Chief), you can acquire 1 day of Pardus Armor for 3 Exotic Crystals.

Lucidi Armor Station Screen (x5 Armor)

While there is no fixed limit to how long you can have Pardus Armor for, you cannot “top up” your Pardus Armor until your armor has returned back to it’s natural state again.

This means that the absolute longest duration a Mooncrusher can have 5x Pardus Armor installed for is 218 days (the Mooncrusher has 325 hull space and with only an Enhanced Mag Scoop and a Nuclear Drive on board, it would be able to carry up to 549t of Exotic Crystals at a time).

Faction Starbases
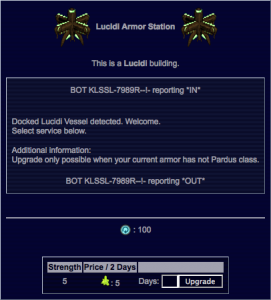
There are two kinds of starbases in Pardus – public starbases (under the control of the game) and player controlled starbases (constructed, commanded and controlled by the pilot).

A public starbase is always located at the same location across all universes.

These starbases consume a range of commodities every 3 hours (starting at 0025 GMT/UTC) which influences the worker population using similar rules as a planet.

The population of an public starbase never drops below 500 workers even if it receives no food or water for upkeep. You cannot capture, destroy, fly-close or hire squadrons from them either.

The majority of starbases are not controlled by the game but are player owned starbases. They can be constructed, bought and sold (transferred) by the owner, and like regular player owned buildings, they use a building slot. They can also be attacked, captured and destroyed by other pilots.

In The Beginning…

A player owned starbase begins its existence as a Trading Outpost (TO). As long as it meets the requirements for becoming a starbase, it’s owner can initiate an 8 stage upgrade process. Each stage of the TO upgrade requires 75t Metal, 50t Electronics and 25t Battleweapon parts to be present in the TO at 0015 GMT/UTC.

The upgrade resources are only consumed if they are all present in the TO, in the right quantities at that time. Should you not have them in the TO at that specific time, you will have to wait 24 hours. Each stage of the upgrade is an independent event so you can take as long as you like to complete this process.

At any time after the 8 upgrade steps have completed, the owner can click a button to complete the upgrade and transform the Trading Outpost into a new starbase with an initial worker population of 1,000. All resources that were in the TO, along with any defenses it may have had, disappear at this time.

Tip: When building a starbase, give some thought to what you will name it in advance… check the spelling. You will have to pay 5,000 APs if you want to rename it

As swiftly as they rise (8 days minimum), without supervision a player owned starbase can quickly downgrade to a Trading Outpost. If the worker population drops below the minimum 500 workers then the starbase ceases to exist – in it’s place will be an empty Trading Outpost. Every item of equipment and all resources stored in the Starbase are lost for good (mercifully the credits are returned to your pilot however).

Worker Population

Worker population is used to determine how much tax the owner receives when the starbase ticks (every 3 hours) – 20% of the worker population. The number of workers also determines how many slots are available to build factories on, the services that are available to visiting pilots and the number of missions available on the starbase Bulletin Board.

The Pardus Manual provides details on worker population:

  • Stage 1 – 500 ≤ workers < 5000 – 4 building slots
  • Stage 2 – 5000 ≤ workers < 15000 – Ship equipment available – 8 building slots
  • Stage 3 – 15000 ≤ workers < 30000: Shipyards available – 12 building slots
  • Stage 4 – 30000 ≤ workers: Black market appears – 16 building slots

The image displayed on the navigation screen for a starbase can be used to reveal whether it is player owned or not (they look very similar but they are slightly different), the faction of it’s owner and it reveals what stage it is (influenced by worker population):

Neutral Player Owned Stage 1 Federation Player Owned Stage 2 Union Player Owned Stage 3 Empire Player Owned Stage 4
Neutral
Stage 1
Federation
Stage 2
Union
Stage 3
Empire
Stage 4

Notes about Starbase Buildings

The Pardus Manual describes the different buildings that a player can build on the pylons in the starbase inner space.

With the exception of the Standard and Heavy Defense Artillery buildings, construction of starbase buildings is the same as that of regular player buildings – each costs 500 APs and requires several resources (stored in the ship – not the starbase) to build. Only the starbase owner can build in the inner space of a starbase.

The Standard Defense Artillery (SDA) and Heavy Defense Artillery (HDA) buildings can only be obtained by first building a Light Defense Artillery (LDA) building and investing extra resources to upgrade.

As well as requiring resources to initiate, the upgrade process takes 12 hours to turn a LDA into a SDA, and a further 18 hours to upgrade a SDA to a HDA.

Upgrading a LDA to a SDA Upgrading a SDA to a HDA

In total it will take a minimum of 30 hours from the construction of a LDA building until it has finished being upgraded to a HDA.

The Impact of losing Starbase Buildings

While the loss of buildings impacts current production, it does not affect any ships, weapons or equipment built prior to the building loss.

Should worker population drop enough to cause a player starbase to drop a stage, all buildings that were built on the outer-most 4 building slots will be immediately destroyed. All ships, weapons and equipment that were in the process of being built in those buildings at the time are also destroyed.

If a Warehouse Factory building is destroyed as part of such a population decline, and if this leaves the starbase with more resources than it has room to store, any excess resources will be immediately dropped, starting with the most expensive resources first.

When a starbase doesn’t have a building able to produce an item in inventory (maybe it currently has no Weapons Factory – but guns and missiles are in inventory from a previous Weapons Factory), then that inventory is not visible and cannot be sold.

As soon as a building is constructed that can produce any item already in inventory, then all the inventory for that type of building is immediately available for sale. If a starbase has at least one shipyard, then all ship sizes already in inventory are also available for sale.

Lesser-known Observations on Starbases

Here are some unrelated notes on player owned starbases collected from conversations with pilots, various places in the Pardus Manual and Pardus Forums as well as from first-hand experiences.

  • a hack on the owner never reveals the presence of a starbase
  • you can only have one starbase in your possession at any time
  • it costs 4,000 APs to initiate transfer to another pilot
  • a starbase transfer takes 24 hours from initiation to completion
  • you cannot self destruct your starbase while it is being transferred
  • starbase transfers fail at completion time if the recipient has no building slot
  • when the owner retires, their starbase disappears completely
  • if docked at a starbase that is destroyed you remain unaffected
  • if ambushing on a TO that upgrades, your ambush is broken
  • while not visible, each starbase comes with 4 defense modules
  • all faction equipment in a starbase is lost if the owner leaves that faction
  • fly-close always puts you randomly at [3,3], [9,3], [3,9] or [9,9]
  • an ambush at [3,3], [9,3], [3,9] or [9,9] won’t trigger on the initial fly-close
  • you cannot cloak in inner space
  • it costs no APs to fly-close or exit inner space
  • you cannot exit inner space if you are affected by a stun time bomb
  • you can’t set ambush in fly-close with a retreat point set outside
  • you can’t set ambush outside with a retreat point set inside fly-close
  • starbases in the PFC, PUC and PEC get paid a daily subsidy at 0526 (GMT/UTC)
  • a destroy building bounty can be collected by destroying the starbase owned by the bountied pilot
  • when you transfer a starbase, the recipient gets no notification at all until they receieve the starbase

Do you have some lesser-known observations of your own? Please get in touch and I’ll add them here as well!

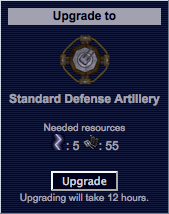
Congratulations on your promotion to Prince! The Emperor will likely be in touch soon to offer you a place in his royal guard – or so they say.

You may have completed much of the Advanced Skills available to you, saved up lots of cash and been looking forward to being promoted since you first piloted a Rustclaw.

Before you rush out and buy that shiny yellow Mooncrusher… there is one more thing you should consider.

Take a look at your cloak skill

Are you satisfied with your current level of cloak skill and your ability to cloak? The Mooncrusher is almost as large as a small asteroid – and it’s hard to disguise an asteroid. Being bright yellow doesn’t help either!

Unfortunately for many young Princes and Princesses, by the time they discover that they can’t cloak their new ship, it is already too late. They have paid upwards of 38 million on their new ship and are not interested in trading out of it.

Why do I need cloaking skill?

If you want to ambush and engage in PvP then you need to be able to cloak.

A high cloak skill means you can cloak at your ambush site quickly and hopefully remain unseen doing so. A low cloak skill will mean you spend more time visible at your ambush site – providing your enemies a chance to notice your exact location. At 100 APs per cloaking attempt, it is also an expensive activity!

If you don’t bother training your cloak skill until after you have your Mooncrusher, you will likely remain disadvantaged for quite some time. The huge ship size means that you will fail almost all of your early attempts at cloaking.

Why not just cloak train in the Mooncrusher?

The Pardus Manual tells us:

… Your skill in cloaking … will increase with every successful cloaking attempt (and also a very small amount with every unsuccessful attempt) …

So even though your cloak skill improves with a failed cloak attempt, it is only by a “very small amount”. Because of the low success rate caused by the large ship size, you will end up spending huge amounts of APs cloaking (or attempting to at least) for just a few points of cloak skill.

If you were to cloak train in an SSC with a cloak skill of around 15, your cloak skill will reach 16 in less than 2 days. Using a Mooncrusher will take almost 18 days.

Cloaking the Shadow Stealth Craft – smallest of Imperial ships, even with a very low cloak skill, provides an excellent chance of success (giving the best cloak skill gains) for the amount of APs used.

It is not expensive to do it since you don’t need guns, armor, shields, etc so pay no maintenance costs. Just sit on a friendly starbase on an Energy tile and cloak… uncloak… cloak…

How much cloak skill should I train to?

Aim to have a cloak skill of 30 at least before you step into the Mooncrusher. If you take a week out between each of your ship upgrades to sit in an SSC and cloak train, you probably won’t need to do anything special.

How long will it take?

To improve your cloak skill from 10 through to 35 will take about 563,000 APs in an SSC – about 97 days of cloaking from start to end. That time can be significantly reduced by taking drugs to provide you up to twice as many APs per day.

Make sure you understand how to get optimal AP gains from drug use… you don’t need Trip Control and Meditation, but it will be a little more convenient if you do.

A Guide to Hack Training

Hacking InformationThe Pardus Manual introduces the role of a Hacker:

In a highly developed universe almost all technical facilities are connected via networks and approachable via terminal stations. By infiltrating these systems, experienced computer pirates can steal valuable information and possibly sell it. This is called Hacking.

Hackers are very useful to help locate enemies and provide support to fighters especially in times of war. They are often the silent hero in a campaign – but can make a good income selling their services to the highest bidder.

Based on the Hack skill spreadsheet and Pardus Forums – Hack Knowledge Thread

What do I need to do to be a Hacker?

You need to improve your Hack skill to a point where you can hack information that will be of use to you. That point will vary for each hacker – driven by how much information they want to gather.

For example: a Skilled hack will show the current cluster of the pilot, a Freak hack will add the sector of the pilot, and a Guru hack will add their coordinates.

A Hacker with Hack skill of at least 50 is a good initial goal. Doing so with Hack efficiency Advanced Skill is useful if you want to be more AP efficient. Adding the Echo hack Advanced Skill is the next goal. The rest of a Hacker’s career can be spent improving their Hack skill to get better and better chances of success using the Guru hack.

The best way to improve your Hack skill is to hack a faction pilot while at the Blackmarket of a faction Planet or Starbase.

  • use Brute hack until Hack skill 25
  • use Skill hack from Hack skill 25 to 50
  • use Freak hack from Hack skill 50

Because of the risk of getting a faction bounty, EPS pilots are advised to use a different set of rules:

  • Trade log hack a neutral player Starbase until Hack skill 40
  • Planet log or Starbase log hack at a neutral Planet or Starbase from Hack skill 40

Watch your reputation

You will get a bounty from the faction whose pilot you are hacking if they detect you (they can detect you whether you fail or succeed in the hack – but the chance is much less if you are successful). These bounties lead to a -5 daily reputation loss against that faction until they are gone (either expiring or being collected by another pilot).

You will also get reputation loss each time you fail a hack based on the type of hack you were attempting. This could lead to you losing safety or even docking rights at a faction Planet.

The Pardus Manual has a detailed breakdown of reputation loss should you be interested in specifics.

It is a good idea to hack train at a player owned Starbase where you have been friended – and don’t hack your own faction if you can avoid it (you could eventually be kicked from your faction if your reputation drops too low).

Killing Inexperienced Pirates and Experienced Pirates as well as completing missions will improve your reputation (but distracts from training your Hack skill).

How long will it take?

Because you get diminishing returns as your Hack skill improves, it will take you longer to improve when you are higher skilled. The tables below give a good approximation of days.

Begin hacking using a Brute hack to give you more successful hacks (which mean better gains in your Hack skill).

Starting
Hack Skill
Ending
Hack Skill
Required
Action Points
Estimated
Days Hacking
10 15 11,321 2.9 *
15 20 22,043 5.7 *
20 25 36,336 6.3

* adjusted to account for Brute hack not being 100% success rate until Hack skill 20

If you like, switch to Skilled hack (now at 100% success rate).

Starting
Hack Skill
Ending
Hack Skill
Required
Action Points
Estimated
Days Hacking
25 30 54,200 9.4
30 35 75,636 13.1
35 40 100,643 17.5
40 45 129,221 22.4
45 50 161,371 28.0

If you like, switch to Freak hack (now at 100% success rate).

Starting
Hack Skill
Ending
Hack Skill
Required
Action Points
Estimated
Days Hacking
50 55 197,093 34.2
55 60 236,386 41.0
60 65 279,250 48.5
65 70 325,686 56.5
70 75 375,693 65.2
75 80 429,271 74.5
80 85 486,421 84.4
85 90 547,143 95.0
90 95 611,436 106.2
95 100 679,300 117.9

A Guide to Cloak Training

Cloaked SSC in EnergyYou may need to cloak your ship at some point (usually when you are ambushing an enemy).

The chance of successfully cloaking relies on only three things – your ship size, the resource type you are on and your Cloak skill.

  • you have a better chance to cloak in a small ship than a large ship
  • the easiest resource to cloak in is Energy
  • having a high Cloak skill will improve your chance of cloaking

This guide explores how you can increase your Cloak skill – preferably before you have taken ownership of a Mooncrusher!

Ways to improve Cloak skill

You can improve your Cloak skill by attempting to telerob another pilot without being noticed, or cloak your ship (via the Nav screen).

Telerobbing costs 50 APs and requires you wait 90 seconds before repeating. It would take almost 3 hours to use your daily 5,720 APs.

Cloaking costs 100 APs and has no waiting penalty before repeating. Even if you are not successful in a cloaking attempt, your Cloak skill will still improve a little (unfortunately this gain is minuscule compared to that gained when successfully cloaking).

Cloaking a ship is the fastest route, and this guide continues assuming you are going to be cloaking your ship.

How long does it take?

Assuming you are using an SSC in Energy, not doing anything else with your APs, and not using Drugs at all – then use this to guide you:

Starting
Cloak Skill
Ending
Cloak Skill
Days of
Cloaking
15 20 ~ 11
20 25 ~ 18
25 30 ~ 26

You can reduce the time through use of Drugs:

Starting
Cloak Skill
Ending
Cloak Skill
Days of
Cloaking
15 20 ~ 6
20 25 ~ 11
25 30 ~ 16

Without Drugs it would take about 55 days to go from 15 to 30 Cloak skill. Using up to 18t Drugs per day would cut this to about 33 days.

What do I need to do?

Change into the smallest ship you can – ideally a Shadow Stealth Craft (size 7) or Interceptor (size 8). Don’t invest in any weapons, armor or equipment. Then find a starbase built in Energy – and make sure you are safe from attack.

Press the Cloak button from the Nav screen – and once cloaked, press the Uncloak button. Repeat until you are out of APs… and then come back the next day and do it all again!

Why should I do this again?

If you end up in your “end game” ship, it will most probably be large in size. If you have low Cloak skill then you will have fewer successful cloaks. This could really hinder you if setting ambush – the enemy has a better chance to notice you setting.

When in a small ship = better chance to cloak = more successful cloaks = better gains per APs

Doing this task before you move into a large ship is the fastest and most AP efficient thing to do. You may consider the Cloak Boost Advanced Combat Skill if you are already in your large ship. Crew members can also help. But it will take a lot longer doing it this way.

A more detailed breakdown of AP costs (averaged gains for an SSC):

Starting
Cloak Skill
Ending
Cloak Skill
Required
Action Points
15 16 9,500
16 17 10,300
17 18 12,000
18 19 13,300
19 20 15,300
20 21 16,500
21 22 18,400
22 23 19,700
23 24 22,000
24 25 23,700
25 26 25,600
26 27 27,400
27 28 29,900
28 29 32,200
29 30 34,000

What Makes For A Great Trader?

Traders are the lifeblood of any economy – no matter how big or small. They ensure buildings are traded on time, that they don’t overflow with excess production and stockpiles don’t accumulate in the wrong place.

Traders are on every day – regular as clockwork to make sure your buildings make money, that planet populations are maintained and starbases continue to thrive.

Everyone can trade, but to be a great trader requires more than just carrying some food and water to a building once in a while.

Trade Etiquette

Ranking opportunities, ambushes, emergencies and limited cargo capacity can all work against even the most dedicated trader – but some simple points can ensure you make the best of the situation.

  • When taking food and water from buildings around a starbase, always make sure they are stocked to tick
  • If a starbase has no room left, make some! Turn on your Magnetic Scoop and buy Animal Embryos (or Energy if there are excessive amounts) and sell it to the Blackmarket (or dump it into space)
  • When stocking buildings always supply even amounts of Food and Water (if they are uneven, balance them out)
  • When trading a building, ensure it has enough upkeep to tick until you are due to return again
  • It is better (in terms of production quantity) to supply 3 buildings for 1 tick than it is to supply 1 building for 3 ticks
  • Keep an eye on shortages or excesses and let others know so they can import or export them if required

In general, try your best to treat all buildings as though they were your own.

How Many Action Points to Jump?

With the addition of an improved Mag Scoop (able to hold up to 250t), transporting goods through Y-Holes and X-Holes has become a viable option to consider when travelling large distances.

According to the Pardus Manual, jumping a Y-Hole or X-Hole initially costs over 2,000 action points and is based on your Maneuver skill. The higher your skill, the less action points are required to perform the jump (as with a regular Wormhole).

Be sure to remember that your Maneuver skill is significantly affected with a full Mag Scoop. While the cost to jump might be 1,100 action points with a Maneuver of 68, a full scoop may reduce your Maneuver so much that it will most likely cost 2,000 action points regardless of your starting Maneuver skill.