A Guide to Cloak Training

Cloaked SSC in EnergyYou may need to cloak your ship at some point (usually when you are ambushing an enemy).

The chance of successfully cloaking relies on only three things – your ship size, the resource type you are on and your Cloak skill.

  • you have a better chance to cloak in a small ship than a large ship
  • the easiest resource to cloak in is Energy
  • having a high Cloak skill will improve your chance of cloaking

This guide explores how you can increase your Cloak skill – preferably before you have taken ownership of a Mooncrusher!

Ways to improve Cloak skill

You can improve your Cloak skill by attempting to telerob another pilot without being noticed, or cloak your ship (via the Nav screen).

Telerobbing costs 50 APs and requires you wait 90 seconds before repeating. It would take almost 3 hours to use your daily 5,720 APs.

Cloaking costs 100 APs and has no waiting penalty before repeating. Even if you are not successful in a cloaking attempt, your Cloak skill will still improve a little (unfortunately this gain is minuscule compared to that gained when successfully cloaking).

Cloaking a ship is the fastest route, and this guide continues assuming you are going to be cloaking your ship.

How long does it take?

Assuming you are using an SSC in Energy, not doing anything else with your APs, and not using Drugs at all – then use this to guide you:

Starting
Cloak Skill
Ending
Cloak Skill
Days of
Cloaking
15 20 ~ 11
20 25 ~ 18
25 30 ~ 26

You can reduce the time through use of Drugs:

Starting
Cloak Skill
Ending
Cloak Skill
Days of
Cloaking
15 20 ~ 6
20 25 ~ 11
25 30 ~ 16

Without Drugs it would take about 55 days to go from 15 to 30 Cloak skill. Using up to 18t Drugs per day would cut this to about 33 days.

What do I need to do?

Change into the smallest ship you can – ideally a Shadow Stealth Craft (size 7) or Interceptor (size 8). Don’t invest in any weapons, armor or equipment. Then find a starbase built in Energy – and make sure you are safe from attack.

Press the Cloak button from the Nav screen – and once cloaked, press the Uncloak button. Repeat until you are out of APs… and then come back the next day and do it all again!

Why should I do this again?

If you end up in your “end game” ship, it will most probably be large in size. If you have low Cloak skill then you will have fewer successful cloaks. This could really hinder you if setting ambush – the enemy has a better chance to notice you setting.

When in a small ship = better chance to cloak = more successful cloaks = better gains per APs

Doing this task before you move into a large ship is the fastest and most AP efficient thing to do. You may consider the Cloak Boost Advanced Combat Skill if you are already in your large ship. Crew members can also help. But it will take a lot longer doing it this way.

A more detailed breakdown of AP costs (averaged gains for an SSC):

Starting
Cloak Skill
Ending
Cloak Skill
Required
Action Points
15 16 9,500
16 17 10,300
17 18 12,000
18 19 13,300
19 20 15,300
20 21 16,500
21 22 18,400
22 23 19,700
23 24 22,000
24 25 23,700
25 26 25,600
26 27 27,400
27 28 29,900
28 29 32,200
29 30 34,000

Tastefully insert a selection of clocks into the navigation bar of the main screen showing times that various events happen in Pardus.
These are the same clocks that are available on our Pardus Clock page – but you decide what clocks to show and how they appear (instructions in the script comments).

Get the English language (default) version of this script:

Recent modifications introduced the ability to control the language used when the labels and clock messages are displayed. This can be configured by following instructions in the script comments – or you can just take one of the following pre-configured scripts:

Current language support is for English, German and French. Please contact me if you wish to provide other translations (and for any corrections).

What Makes For A Great Trader?

Traders are the lifeblood of any economy – no matter how big or small. They ensure buildings are traded on time, that they don’t overflow with excess production and stockpiles don’t accumulate in the wrong place.

Traders are on every day – regular as clockwork to make sure your buildings make money, that planet populations are maintained and starbases continue to thrive.

Everyone can trade, but to be a great trader requires more than just carrying some food and water to a building once in a while.

Trade Etiquette

Ranking opportunities, ambushes, emergencies and limited cargo capacity can all work against even the most dedicated trader – but some simple points can ensure you make the best of the situation.

  • When taking food and water from buildings around a starbase, always make sure they are stocked to tick
  • If a starbase has no room left, make some! Turn on your Magnetic Scoop and buy Animal Embryos (or Energy if there are excessive amounts) and sell it to the Blackmarket (or dump it into space)
  • When stocking buildings always supply even amounts of Food and Water (if they are uneven, balance them out)
  • When trading a building, ensure it has enough upkeep to tick until you are due to return again
  • It is better (in terms of production quantity) to supply 3 buildings for 1 tick than it is to supply 1 building for 3 ticks
  • Keep an eye on shortages or excesses and let others know so they can import or export them if required

In general, try your best to treat all buildings as though they were your own.

Magnetic Scoop and Movement Costs

The Magnetic Scoop increases the quantity of resources you can hold in your ship at any one time.

The recent addition of the Enhanced Magnetic Scoop increased the amount that can be stored by a further 100t to a whopping 250t extra storage space.

The Large Print Giveth and The Small Print Taketh Away

Unfortunately, when you put resources into the Magnetic Scoop, the cost of moving your ship suddenly shoots through the ceiling. The more you have in your Magnetic Scoop, the greater the movement penalty for your ship.

This is no problem if you don’t intend on moving (for instance, when performing building upgrades – another pilot can drop resources onto you, allowing you to complete upgrades without having to increase the capacity of your building).

If you do plan on moving, you might be interested in exactly how much of a movement penalty you will have to deal with.

The Original 150t Magnetic Scoop

movement_penalty = ceiling ( amt_in_scoop / 5 ) + 10

Example: 75t in your Magnetic Scoop costs 25 action points per tile extra.
Example: 150t in your Magnetic Scoop costs 40 action points per tile extra.

The Enhanced 250t Magnetic Scoop

This is basically 10 action points per tile cheaper that the 150t Magnetic Scoop for the same amount of resources. Of course it can hold an extra 100t as well.

movement_penalty = ceiling ( amt_in_scoop / 5 )

Example: 75t in your Magnetic Scoop costs 15 action points per tile extra.
Example: 150t in your Magnetic Scoop costs 30 action points per tile extra.
Example: 250t in your Magnetic Scoop costs 50 action points per tile extra.

Don’t go hauling goods long distance with a full Magnetic Scoop – but it may be ideal for travelling 1 or 2 tiles. You be the judge!

How Many Action Points to Jump?

With the addition of an improved Mag Scoop (able to hold up to 250t), transporting goods through Y-Holes and X-Holes has become a viable option to consider when travelling large distances.

According to the Pardus Manual, jumping a Y-Hole or X-Hole initially costs over 2,000 action points and is based on your Maneuver skill. The higher your skill, the less action points are required to perform the jump (as with a regular Wormhole).

Be sure to remember that your Maneuver skill is significantly affected with a full Mag Scoop. While the cost to jump might be 1,100 action points with a Maneuver of 68, a full scoop may reduce your Maneuver so much that it will most likely cost 2,000 action points regardless of your starting Maneuver skill.

Imperial Roidworm Horde Locations

Our recent NPC Skilling Order for Imperials guide suggests Roidworm Hordes are ideally placed to take your Hit Accuracy from 42 up to about 55.

Some call them docile and harmless, but I have heard stories that they can explode when angered – causing tremendous damage to any pilots foolish enough to be in the vicinity.

Once dead, Roidworm Hordes take about 6 hours to respawn – within 2 or 3 tiles of the location indicated below.

Roidworm Hordes in Empire West Ska’ari
Anayed map [11,3]
Beeday map [6,1]
Belati map [21,9]
Edvea map [8,1]
Fawaol map [16,6]
Iowagre map [9,1]
Roidworm Hordes in Empire Ska’ari Core
Lamice map [6,18]
Lianla map [6,5]
PO 4-991 map [9,7]
Quana map [12,13]
RV 2-578 map [9,4]
Sigma Draconis map [19,2]
Tiexen map [4,14]
Roidworm Hordes in Empire Keldon Core
Delta Pavonis map [5,5]
Eta Cassiopeia map [8,7]
Greandin map [9,16]
Iniolol map [13,9]
Keldon map [12,26]
Quator map [8,3]

Investigating Worker Population

Have you every wondered why some Player Starbases have a worker population of exactly 50,000 – while others have a population of exactly 50,083? Just what is so special about those numbers?

Every Starbase tick, a payment (marked as tax) is made to the Starbase coffers based upon the current number of Workers living there. For non-Core Starbases, this figure is calculated as 20% of the worker population.

The default setting for a Starbase population is 50,000 workers, requiring 100t of Water and 150t of Food per Starbase tick (every 3 hours) to maintain.

It appears that using the default of 50,000 population delivers nice round numbers (profit per Starbase tick):

50,000 workers + 100t Water + 150t Food = 10,000 credits

Why is it common to see 50,083?

Due to the impact of rounding numbers, the same 100t of Water and 150t of Food, can sustain 50,083 workers! With this slight increase in population comes an increased amount of tax revenue as well.

50,083 workers + 100t Water + 150t Food = 10,017 credits

Instead of 10,000 credits, a Starbase with 50,083 workers is paid 10,017 credits per Starbase tick. While 17 credits can’t buy very much, it equates to over 49,000 credits per year – for zero extra work or cost!

How high can you go?

Doubling the initial numbers that we used earlier allows the same observation…

100,000 workers + 200t Water + 300t Food = 20,000 credits

After some testing, it turns out that you can support a population of 100,083 Workers for the same upkeep costs:

100,083 workers + 200t Water + 300t Food = 20,017 credits

As before, exactly 17 credits extra profit is paid per tick which equates to over 49,000 credits per year.

In Conclusion

For doing nothing but changing a setting… once…

Setting the Worker Population to be 50,083 instead of leaving it at the default of 50,000 leads to an extra 49,000 credits per year.

It’s hard to understand why any Starbase Commander would deliberately overlook such an obvious money making opportunity!

Ship Choices for Skilling

So, we just had an amazing war. You spent the war as a trader watching massive first-wavers getting all the glory while you were stuck watching Skype chat. Now you’re ready to become a first-waver yourself. But, what’s the best way to do it? Should you buy a Dominator? A Hawk? Should you buy huge guns and start blasting?

Nope!

Step 1 to becoming a first waver is to unlock the BBB or Boa. To get to a BBB, you have to kill lots of stuff and should have around 40 maneuver once you’re there.

Ship Setup

Big Brown Box (BBB) with 5x organic armor and NO GUNS. Yes, NO GUNS.

From there you fly to Vaereth or another skilling nook and proceed to engage swarmlings over and over. Within a couple of weeks, you’ll be trading in skills for advanced skills!

The reason you want no lasers is that lasers actually damage the swarmlings while not gaining you any trade ins. So, you’re best off just taking lots of hits.

What to do with your first trade ins

Now that you’ve been fighting Swarmlings for a few weeks or more, you’ve traded in your engineering a couple of times and your manuever once and you can now buy your first advanced skill! Your first advanced skill should be offensive combat 1 (OC).

Why OC1? OC1 will make swarmlings hit you more often which will raise your engineering more quickly in fewer AP. Once you have OC1, you’ll pick up combat efficiency 4 next… From there, you’ll be on to defensive combat, agility boost, time bomb 1, ambush fall back, and weapons mastery…

Once you have most the advanced skills, you can bring your maneuver up to 85 and you’re now in shape to take on Military Outposts! Be warned, to takes most players 2+ years to get to the point of fighting military outposts. Many of us have played for longer and still can’t manage it!

Tile Regeneration Rate

In a recent article about Strip Mining I explained why it was considered such a bad thing to do.

There seems to be a lack of readily accessible detail about this aspect of Pardus, so I did a little research and come up with some information that I’m happy to share.

When Do Tiles Replenish?

Every day at 00:12 GMT, the tiles around the universe spontaneously replenish by an amount based on their current level (with the exception of the Exotic Matter tiles).

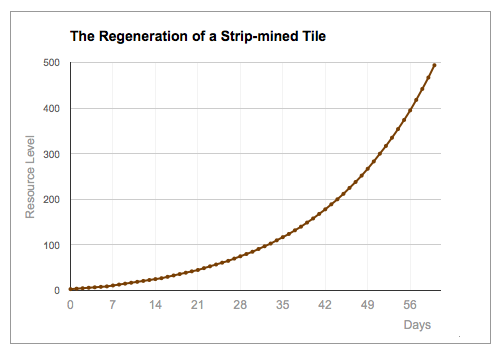
The amount they gain per day is roughly calculated as:

Gain = Floor(Current Level * 5.47% + 1.54)

Which can be used to graph the regeneration of a heavily mined tile…

You can also summarise how many days it takes to fully replenish tiles from varying starting levels:

  • 10 days to grow from 285 -> 500
  • 20 days to grow from 160 -> 500
  • 30 days to grow from 87 -> 500
  • 40 days to grow from 45 -> 500
  • 50 days to grow from 20 -> 500
  • 60 days to grow from 3 -> 500

And that pretty much concludes tile regeneration!

How To Search Old GNN Entries

The Global News Network supplies regular updates on the events happening around the universe.

After a while the older news entries are replaced by reports of new events. If you have Premium access, you are able to download a limited number of previous news entries in a file. If you are not Premium, then there is no way that you can look back at past news entries in Pardus.

The Global News Network publishes a feed of many of it’s news reports to Twitter – saving them from being lost completely. Twitter provides access for the last 3,200 Twitter posts for each feed – providing you access to a little over 1 month of previous reports.

Snap Bird (link to the Artemis Feed Search) is one of several different tools that allow you to access and search Pardus Twitter feeds.

So now, if you missed it first time, you may still be able to find that elusive message hiding in Twitter.